Theme Option
After activating our theme, you can go to Rokanthemes => Theme settings to configure the theme. We will explain what you can do with Theme Options.
General setting

- Enable page preloader: Show icon loader until complete page is fully loaded, including all frames, objects and images
- Page Width: Width of page.
- Icon LazyLoad:Icon loader.
Font setting

- Body Font Size:Body font-size
- Body Font Family: Font family of body. You can use google font or custom font.
- Customize (Body Font):Font weight of body font
- Heading font family Font family of heading (h1, h2, h3, h4, h5, h6...), you can use google font or custom font.
Newsletter Popup
Change newsletter Popup settings in Rokanthemes => Theme settings

You can: enable or disable, set width, set height, background color or background images, change text, in here:

Header
Sticky header setting:
Rokanthemes => Generals settingsWhen a visitors scrolls down the header will remain in view at the top of the browser rather than moving out of view at the top of the screen. The sticky header can help to make it easier for visitors to navigate through a site as they can quickly access the navigation menu rather than having to scroll back to the top of the page.

- Sticky Header: Choose Yes to enable sticky header.
- Sticky Logo: Logo when sticky header
Favicon Icon and Logo
Go to: Content => Design => Configuration in admin page then choose edit themes to change Logo and Favicon icon.
![]()


- Favicon: Scroll down to HTML Head, choose Upload button to set your Favicon.
- Logo: In task Header.
- Logo Image: Upload your logo. Customto set background color for sticky header.
- Logo Attribute Width: Set width of logo.
- Logo Attribute Height: Set height of logo.
Header Customization:
Follow this direction below to custom header template: app\design\frontend\bluesky\bluesky_armania_carparts\Magento_Theme\templates\html\header.phtml. If you use carparts2, carparts3... please find header.phtml file in: bluesky_armania_carparts_2, bluesky_armania_carparts_3... folder.

Foooter
Foooter Primary

Also, If you want to edit Copyright info, please going Content > Design> Configuration > FooterYou can see like this image

Slideshow
We created a management system very professional slideshow. You can create slideshows with multiple pages.
Home Page Slideshow
You can follow this video: https://www.youtube.com/watch?v=IEGpVb4Gz3M
To Set up slideshow on homepage. Please going to Rokan Themes > Manager Slider then click button Add Slider
Then go to home page => Insert Widget => RokanThemes - Slider Banner Widget
like this image


In Setting Slider tab are all options related to Main Slishow

- Effect: Animation for image slider.
- Autoplay: Auto run Hompage Slide Show on Main Page
- Direction Nav: Show Button Option(True/False)
- Stop On Hover: Set to 'True', if you want to pause the transaction when the slideshow is mouseovered.
- Control Nav: Show Button Next Back Option(True/False)
- Control Nav Thumbs: Option(True/False): Thumb nail image in bottom.
- Pause On Hover:Include Rewind Speed
- Show Progress Bar: Show/hide progress bar
If you need Edit Content and Images of Slideshow. Please going to Rokanthemes > Manage Banner Then looking for General tab you need setting:
- Slider : Select slider your created in tab manager slider if have many slidershow.
- Status : Enable/Disable
- Position : Posistion of slider.
- Image : Image Slideshow
- Image on mobile (<767px): Image Slideshow
- Add Link :Link banner when you click
- Show Caption: Include Text banner
- Caption Position: Position of caption text in slider

Custom menu
We realsed custom menu for Armania Themes. This custom menu have many option you that can choose
1. Setting module
In admin page. Go to: Rokanthemes/Custom Menu

Enable: Choose Yes if you want custom menu.
Default Menu Type: This is type of menu that will be displayed if you choose Default type in the Menu type option in Catalog/Categories setting
Visible Menu Depth: Show number of sub menu categories.For example, if you set this value to 2, only second level categories will be displayed.
Static Block(before): Set identifier of static block content that will be shown before the default category menu items and after home link.
Static Block(after): Set identifier of static block content that will be shown afer the default category menu items and after home link.
After set identifier of Static Block(before, after). Go to Content => Block and add new block. Make sure that this block have identifier same as identifier that you just set in Custom menu module. Click Show / Hide Editor to put html.
You have to keep HTML structural and class like bellow to make sure it don't break style. If it have submenu, put this HTML tag
<div class="open-children-toggle"></div>
after level-top to open submenu in mobile.

If you don't want to use static block in menu, make it empty.
Category Labels: This options are values in Category label and can be assigned to every category in Catalog > Categories > Category Label

2. Custom sub menu.
With this module, you can easy custom your sub menu.
In admin page, go to: Catalog/Categories then select category that you want to custom submenu. Choose Enable Category and Include in menu. Scroll down, you will see custom menu option.
 .
.
Let see what we can do!
Generate option.
 .
.
Hide This Menu Item: Hidden this category in main menu.
Menu Type: Type of sub menu. We have three type menu: Classic, Full width, Static menu.
- Classic sub menu type: Simple menu, include only categroies.
- Full width sub menu type: Submenu will be show full width (depend on design).
- Static width sub menu type: You can manually set the width of the submenu by put an value in the box Static width.
Sub Category Columns: Column of sub category.
Float: Position of sub menu: left or right.
Icon Image: Insert icon by upload images from your computer. It will be show before category name in main menu.
Font Icon Class: You can input class of font icon on this (Note: Font icon must be included in code folder). With Armania theme, we already included: Font Awesome and IcoMoon icon font. You can go to there web site, choose icon that you want, copy icon name and paste it to this input.

Add content to sub menu.
With custom menu module, you can add text, images, video, iframe, html tags... into submenu. Let see how to do that.

We have 4 editor's corresponding to 4 positions in the sub menu: top, left, right, bottom. In this ediors you can add content that you want to show in submenu. If you want to add html or insert images, it will easier for you if you click WYSIWYG Editor
Left block width, Right block width: Width of right and left block compared to the total width of submenu.
If you don't want to add content in submenu. Please leave emty Editors top and bottom block and choose Do not show with Left block and Right block

Testimonoials Module
Testimonal setting.
Go to admin page, Rokanthemes/Testimonoials/Settings to changes setting Testimonoials module. In here, you can change: Enable, disable module, title of Testimonoials, auto slider, item on destop, tablet, mobile, qty of this, background images....
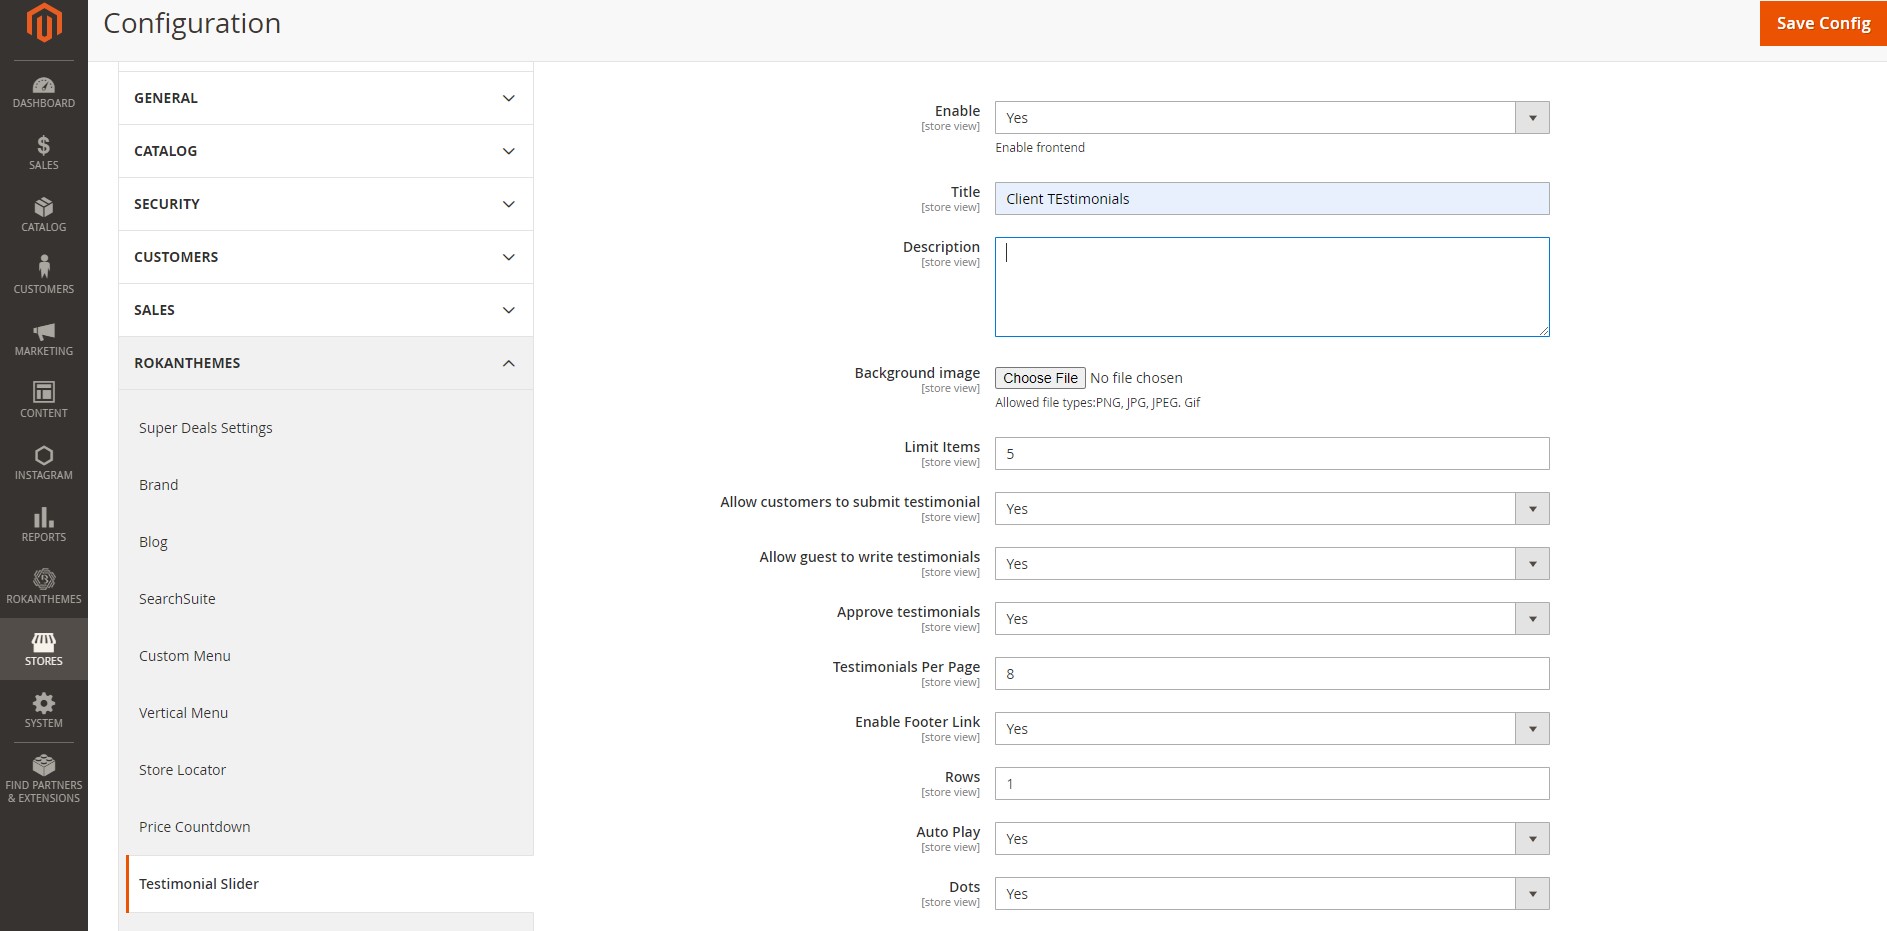
Add new testimonal
Go to admin page, Rokanthemes/Testimonoials/Manage Testimonial and choose add new testimonial.
Blog post Module
Blog post setting.
Go to admin page, Rokanthemes/Blog/Blog setting. In here you can change: Enable, disable module, title blog slider (will show in homepage), Short description, items in destop, mobile, tablet, Sidebar of blog page...

Blog page
Blog page setting.

You will get the results:

Add new blog post.
Go to admin page, Rokanthemes/Blog/Post and choose butoon Add new post.
Onepage checkout
Config Onepage checkout


Enable: Choose Yes if you want to add and show Terms and Conditions when customers check out.
Checkbox Text: Label show in check box.
Checkbox Content: Content of Terms and Conditions.
Title warning: Title warning when customers uncheck on Terms and Conditions check box.
Content warning: Content warning when customers uncheck on Terms and Conditions check box.


Product module
All of products module have a similar setting structure. General Configuration for: Title, description, OWL Product Carousels and set up to four breakpoints for different screen resolutions.
Configuration setting:

Products tab:
- Title : insert text with the title desired, leave the field empty if you do not want the title displayed.
- Description : Short descrition display after title.
- Limit product on tab : Maximum products on tab
- Sorting: Sorting depend on position, product name, price.
- Tab position: Vertical or hozital tab.
- Row on tab: The number of rows will be displayed.
- Mode view: Grid or list.
- Hide Add To Cart : Enable/Disable Add to cart button.
- Hide Add To Compare : Enable/Disable Compare to cart button.
- Hide Add To Wishlist : Enable/Disable Add to wishlist icon.
- Hide Quick view: Enable/Disable Quick view.
- Product images: Choose type of product images.
- Product hover images: Choose type of product images.
- Owl nav : Enable/Disable Nex/Back.
- Owl dot: Enable/Disable dot.
- Owl center: Enable/Disable center.
- Items On Big Desktop: Default qty of products show in eache of row in desktop (Over 1440px).
- Items Desktop: Default qty of products items show in each of row. (1200px - 1439px)
- Items On Desktop Small: Default qty of products show in eache of row in destop small (1024px - 1199px).
- Items On Tablet: Default qty of products show in eache of row in tablet (Screen from: 992px - 1023px).
- Items On Tablet Small: Default qty of products show in eache of row in tablet small(Screen from: 576px - 767px).
- Items On Mobile: Default qty of products show in eache of row in mobile (Max width: 475px).
- Owl margin: Margin value.
Go to page or static block: Insert Widget => Product tab You can customize Products configuration with the following product types:

- Bestseller products.
- Featured products.
- Mostview products.
- New products.
- Top rate produts.
- Onesale produts.
- Random produts.
New Product
If you want to display New Product, When create product you need set Set Product as New from Date. Like this image

Onsale Products
To set onsale product. When you create products, you have to set special price for it. To set special price, please click Advanced Pricing after price input.

Featured Products
To display Featured Product, when create product you need set Featured Product is Yes. Like this image

Category tab
Similar product tab, Go to page or static block: click Show/hide editor button and choose Insert Widget=> Category product tab

Widget option
Categories: Select category that you want to display in tab
Show Category Thumbnail On tab: Yes/Now. If you choose yes, category image will show in tab like our demo. (We using Vertical tab postion)
Other option are simliar with product tab
Sub category column
Similar product tab, Go to page or static block: click Show/hide editor button and choose Insert Widget=> Widget sub category thumb

- Title : insert text with the title desired, leave the field empty if you do not want the title displayed.
- Description : Short descrition display after title.
-
Background :Background of this module.

- Categories: Select category that you want to display.
- Show level: Select sub category level that you want to show.
- Tab position: Vertical or hozital tab.
- Show Product Count: Show or hide product count.
- Show Category Image: Select type of image that you want to show: Image category or Thumb image.
- Show Category Image Type: Show image as hozital or vertical.
- Enable Owl: Enable or disable owl.
Config instagram
1. Go to RokanThemes => Instagram
2. Input your information

Click Submit then click Save Config button.
3. Call Instagram widget
Go to: Content => Elements => Page click edit page. Choose Insert Widget and select the Instagram Widget

4. Config the Instagram as you want.

5. Click button Insert widget and save page. Reload page in frontend, you will see the result.